
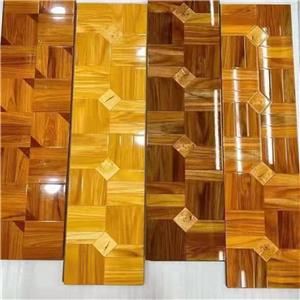

1220*240mm EIR U Groove Three Strips laminate floor Installation
1.Preparation before installation
Confirm the ground condition
a. The ground must be flat, dry, clean, and free of cracks. Use a level to check the flatness of the ground, with an error not exceeding 2-3 millimeters. If the ground is uneven, it needs to be leveled with materials such as self leveling cement.
b. Measure ground humidity, which should be within an appropriate range (generally, wooden floors require ground humidity between 10% and 18%). Overly damp floors may cause issues such as floor deformation and mold growth. If the humidity exceeds the standard, dehumidification treatment should be carried out or the ground should be allowed to dry naturally.
c. Remove dust, debris, oil stains, etc. from the ground to ensure that it is clean and tidy.
Tool preparation
Basic tools: tape measure, pencil, woodworking saw, hammer, rubber hammer, pry bar, square ruler, etc.
Auxiliary tools: floor specific adhesive (if adhesive installation method is used), skirting line installation tools (such as nail guns, screwdrivers, etc.), edge strip installation tools, etc.
material preparation
Flooring material: Accurately calculate the required number of flooring based on the room area and shape, and prepare an additional 5% -10% of spare flooring to cope with cutting errors or later repairs. Check if the specifications, color, and texture of the floor meet the requirements, and if there are any defects such as damage or deformation.
Auxiliary materials: moisture-proof pads, skirting boards, edge strips, etc. Moisture proof pads should be of good quality and moderate thickness to effectively isolate moisture from the ground. The material and color of the skirting board and edge strip should match the floor.
2.Installation process
Laying moisture-proof pads
Lay the moisture-proof pads according to the shape and size of the room, paying attention to the tight splicing between the moisture-proof pads without any gaps. You can use tape to fix the edges of adjacent moisture-proof pads to prevent displacement.
At the corner of the wall, flip up a portion of the moisture-proof pad to a height of about 5-10 centimeters and secure it with tape to better prevent moisture from entering.
Pre laid flooring
Before formal installation, perform a pre lay first. Arrange the floor according to the designed laying direction and pattern on the moisture-proof pad, observe the overall effect, check whether the color and texture of the floor are coordinated and consistent, and determine the optimal installation position for each floor.
For the flooring of the "Three Strips" combination, attention should be paid to whether the joints between the three narrow boards are tight and flat, and whether the connections between different combination units are smooth.
Start installation
Suspension paving method (common method):
Start laying the first row of flooring from a corner of the room. Keep the short side of the first floor at a certain distance from the wall (usually reserve 8-12 millimeters of expansion joints), and then sequentially splice the following floors along the U-shaped groove. When splicing, gently insert the floor into place to ensure that the splicing is tight and seamless. For some tight joints, a rubber hammer can be used to gently tap them into place.
When laying the second row of flooring, pay attention to the splicing method with the first row of flooring. Usually, staggered splicing is used, which means that the starting position of the second row of flooring should be staggered by at least 300 millimeters from the splicing seam of the first row of flooring. This can enhance the stability and overall aesthetics of the flooring. Complete the flooring of the entire room in sequence using the same method.
Adhesive laying method (optional, suitable for certain situations):
Apply floor specific adhesive evenly on the ground, paying attention to the width of the application being slightly smaller than the width of the floor, and the length depending on the length of the floor laid each time.
Place the floor in the predetermined position on the adhesive coated ground, press firmly to ensure that the floor is fully attached to the ground, and use U-shaped grooves to splice the floors together, so that adjacent floors are tightly connected. Do not move the floor without fully curing the glue.
Handle corners and obstacles
When encountering corners, columns, doors, windows, and other obstacles, it is necessary to cut the floor. Use a woodworking saw or other suitable cutting tool to accurately cut according to the actual size. The edges of the cut floor should be polished smooth to avoid scratches.
For positions such as doorways, edge strips can be installed to transition between different areas of the floor, making the joints more beautiful and neat. The installation of the edge strip should be firm, and the gap between it and the floor should be even.
Install skirting board
After the floor is laid, install the skirting board. Firstly, determine the installation height of the skirting board, which is generally 8-15 centimeters. Use a nail gun or screwdriver to fix the skirting board to the wall, paying attention to the even spacing of the nails and not damaging the wall.
The interface of the skirting board should be tightly connected, with no gaps as much as possible. At the corner of the wall, the skirting board should be cut at a 45 ° angle to ensure a beautiful splicing.
3.Check after installation
Overall flatness inspection: Use a long ruler or a guiding edge to place on the surface of the floor and check if the floor is flat and if there are any unevenness. If there are any local unevenness, you can use a rubber hammer to gently tap and adjust.
Joint inspection: Carefully inspect the joints between the floors to ensure that the U-shaped grooves are tightly joined without obvious gaps or height differences. If there are gaps that are too large or the joints are not tight, it is necessary to adjust or replace the floor in a timely manner.
Expansion joint inspection: Check whether the expansion joints around the floor, walls, columns, etc. are uniform and consistent, and whether the width meets the requirements. Expansion joints should be kept unobstructed and not blocked by debris to ensure that the floor has room for expansion and contraction when temperature and humidity change, and to prevent arching and deformation.

