
- carbon crystal panel
- artificial stone
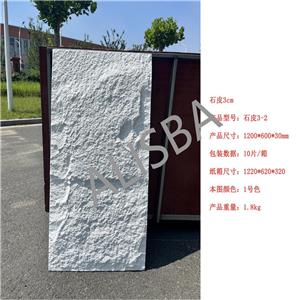
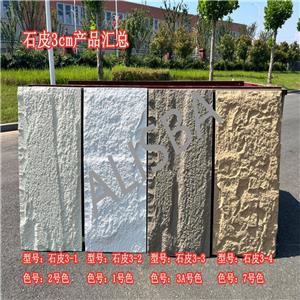
- Stone plastic wall panel
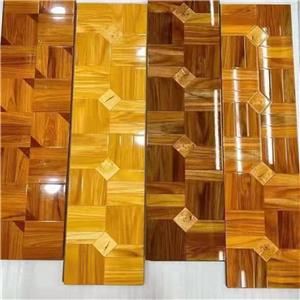
- Fish Bone Laminate Flooring
- self-adhesion wall sticker
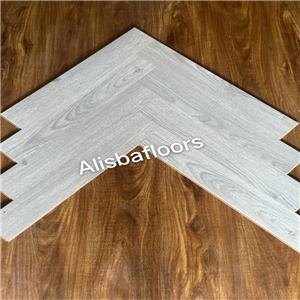
- herringbone Floor
- High customer satisfaction: High quality products win praise
- About rhe SPC Flooring
- About Soft Stone Products
- Have a good news
- News from wall panels
- Industry news
Installation method of acoustic panels
The installation method of sound-absorbing wall panels usually varies depending on the type, material, and design of the wall panels, but the following is a common installation process that applies to most sound-absorbing wall panels:
1. Preparation work
Measuring space: Measure the size of the wall to ensure that the sound-absorbing wall panels you purchase are sufficient to cover the entire wall or designated area.
Cleaning the wall: Ensure that the wall is clean, flat, and free of dust, oil stains, or other impurities to ensure the stable installation of the wall panels.
Inspection tools: Prepare necessary installation tools such as drills, screwdrivers, level rulers, pencils, rulers, safety goggles, etc.
2. Planning and Layout
Marking position: Use a level ruler and pencil to mark the installation position of the wall panel on the wall, ensuring that the installed wall panel is level and aligned.
Pre drilling: If screws are required for fixation, pre drill holes at the marked locations to avoid damage to the wall or wall panels during installation.
3. Install sound-absorbing wall panels
Dry hanging system: Some sound-absorbing wall panels are installed using a dry hanging system, including metal tracks and hooks. First, fix the metal track on the wall, then hang the wall panels onto the hooks to ensure that each panel is firm and aligned.
Direct fixing: For directly fixed wall panels, use pre prepared screws or nails to fix the wall panels to the wall. Ensure the use of sufficient fixing points to support the weight and size of the wall panels.
Adhesive method: Some sound-absorbing wall panels can be directly attached to the wall using strong double-sided tape or professional adhesive. Apply adhesive evenly on the back of the wall panel, and then stick it on the wall to ensure a flat surface and avoid bubbles.
4. Adjustment and inspection
Adjust alignment: During installation, regularly use a spirit level to check if the wall panels are level, adjust the position of the wall panels, and ensure that the entire wall surface is flat and aesthetically pleasing.
Fill gaps: If there are gaps between wall panels or between wall panels and walls, use sealant to fill them to improve sound absorption and aesthetics.
5. Clean up the site
Cleaning tools and materials: After installation, clean the site to ensure that there are no tools or materials left and that the surrounding walls are clean and tidy.
6. Acceptance inspection
Check installation quality: Check if the sound-absorbing wall panels are securely installed, not loose, and if the sound-absorbing effect meets expectations.
matters needing attention
During the installation process, it is essential to follow the manufacturer's instructions and safety recommendations to ensure correct installation methods and safety measures.
For large or heavy sound-absorbing wall panels, professional assistance may be required for installation to ensure safety and installation quality.
Through the above steps, you can ensure the correct installation of sound-absorbing wall panels, thereby effectively improving the acoustic performance and overall design sense of the space.